使用 podman 搭建 immortalWRT 编译环境
使用 dockerfile 构建镜像
 1
 2
 3
 4
 5
 6
 7
 8
 9
10
11
12
13
14
15
16
17
18
19
20
21
22
23
24
25
26
27
28
29
30
31
32
|
# podman build -t openwrt: latest -f Containerfile
FROM ubuntu: 22.04
LABEL maintainer = "songguokunsgg<fansong_yan@icloud.com>"

ARG DEBIAN_FRONTEND = noninteractive
ENV TZ              = Asia/Shanghai

RUN sed -i 's@archive.ubuntu.com@mirrors.tuna.tsinghua.edu.cn@g' /etc/apt/sources.list && \
    apt update && \
    apt upgrade -y && \
    # 部分软件包是编译 immortalwrt 所需的
    apt install -y ack antlr3 asciidoc autoconf automake autopoint binutils bison build-essential \
        bzip2 ccache clang cmake cpio curl device-tree-compiler ecj fastjar flex gawk gettext gcc-multilib \
        g++-multilib git gnutls-dev gperf haveged help2man intltool lib32gcc-s1 libc6-dev-i386 libelf-dev \
        libglib2.0-dev libgmp3-dev libltdl-dev libmpc-dev libmpfr-dev libncurses-dev libpython3-dev \
        libreadline-dev libssl-dev libtool libyaml-dev libz-dev lld llvm lrzsz mkisofs msmtp nano \
        ninja-build p7zip p7zip-full patch pkgconf python3 python3-pip python3-ply python3-docutils \
        python3-pyelftools python3-setuptools qemu-utils re2c rsync scons squashfs-tools subversion swig texinfo uglifyjs \
        upx-ucl unzip vim wget xmlto xxd zlib1g-dev zstd file && \
    # 新建一个普通用户,openwrt 不能用 root 用户编译
    useradd -m user -s /bin/bash

USER user
RUN git config --global user.name "songguokunsgg" && \
    git config --global user.email "fansong_yan@icloud.com"

CMD echo "=========="
CMD echo "podman-compose up -d"
CMD echo "To enter the container:"
CMD echo "podman exec -it OpenWRT bash"
CMD echo "请使用普通用户 user 进行编译"
CMD echo "-----end----"
|
使用 podman-compose 构建容器
 1
 2
 3
 4
 5
 6
 7
 8
 9
10
11
12
|
version: '3.8'
services:
  RK3568:
    image: openwrt
    container_name: OpenWRT
    # volumes:
    #   - "/user/openwrt:/home/openwrt/openwrt"
    network: bridge
    user: user
    command: bash
    tty: true
    stdin_open: true
|
进入容器,默认使用普通用户 user
clone immortalWRT 仓库
1
|
git clone -b openwrt-24.10 --single-branch --filter=blob:none https://github.com/immortalwrt/immortalwrt
|
输出如下:
 1
 2
 3
 4
 5
 6
 7
 8
 9
10
11
|
Cloning into 'immortalwrt'...
fatal: unable to access 'https://github.com/immortalwrt/immortalwrt/': GnuTLS recv error (-110): The TLS connection was non-properly terminated.
openwrt@fcfcdf766fb1:/home/openwrt$ git clone -b openwrt-24.10 --single-branch --filter=blob:none https://github.com/immortalwrt/immortalwrt
Cloning into 'immortalwrt'...
...............
remote: Compressing objects: 100% (4299/4299), done.
remote: Total 9496 (delta 1565), reused 1071 (delta 1071), pack-reused 4126 (from 2)
Receiving objects: 100% (9496/9496), 12.91 MiB | 4.40 MiB/s, done.
Resolving deltas: 100% (2055/2055), done.
warning: unable to access '/root/.config/git/attributes': Permission denied
Updating files: 100% (9699/9699), done.
|
成功 clone,如果出现网络错误请自行解决。
进入仓库 cd immortalwrt,相比 openwrt,immortalwrt 已经内置了大量软件包,因此不需要添加三方软件源。
保证网络通常,获取软件包列表
1
2
|
./scripts/feeds update -a
./scripts/feeds install -a
|
修改默认网络配置(可选)
1
|
vim package/base-files/files/bin/config_generate
|
搜索 192.168,可以定位到 IP 地址所在的位置,修改为 10.0.0.1 和 10.0.$((addr_offset++)).1,我习惯使用 10.0.0.1/24 网段
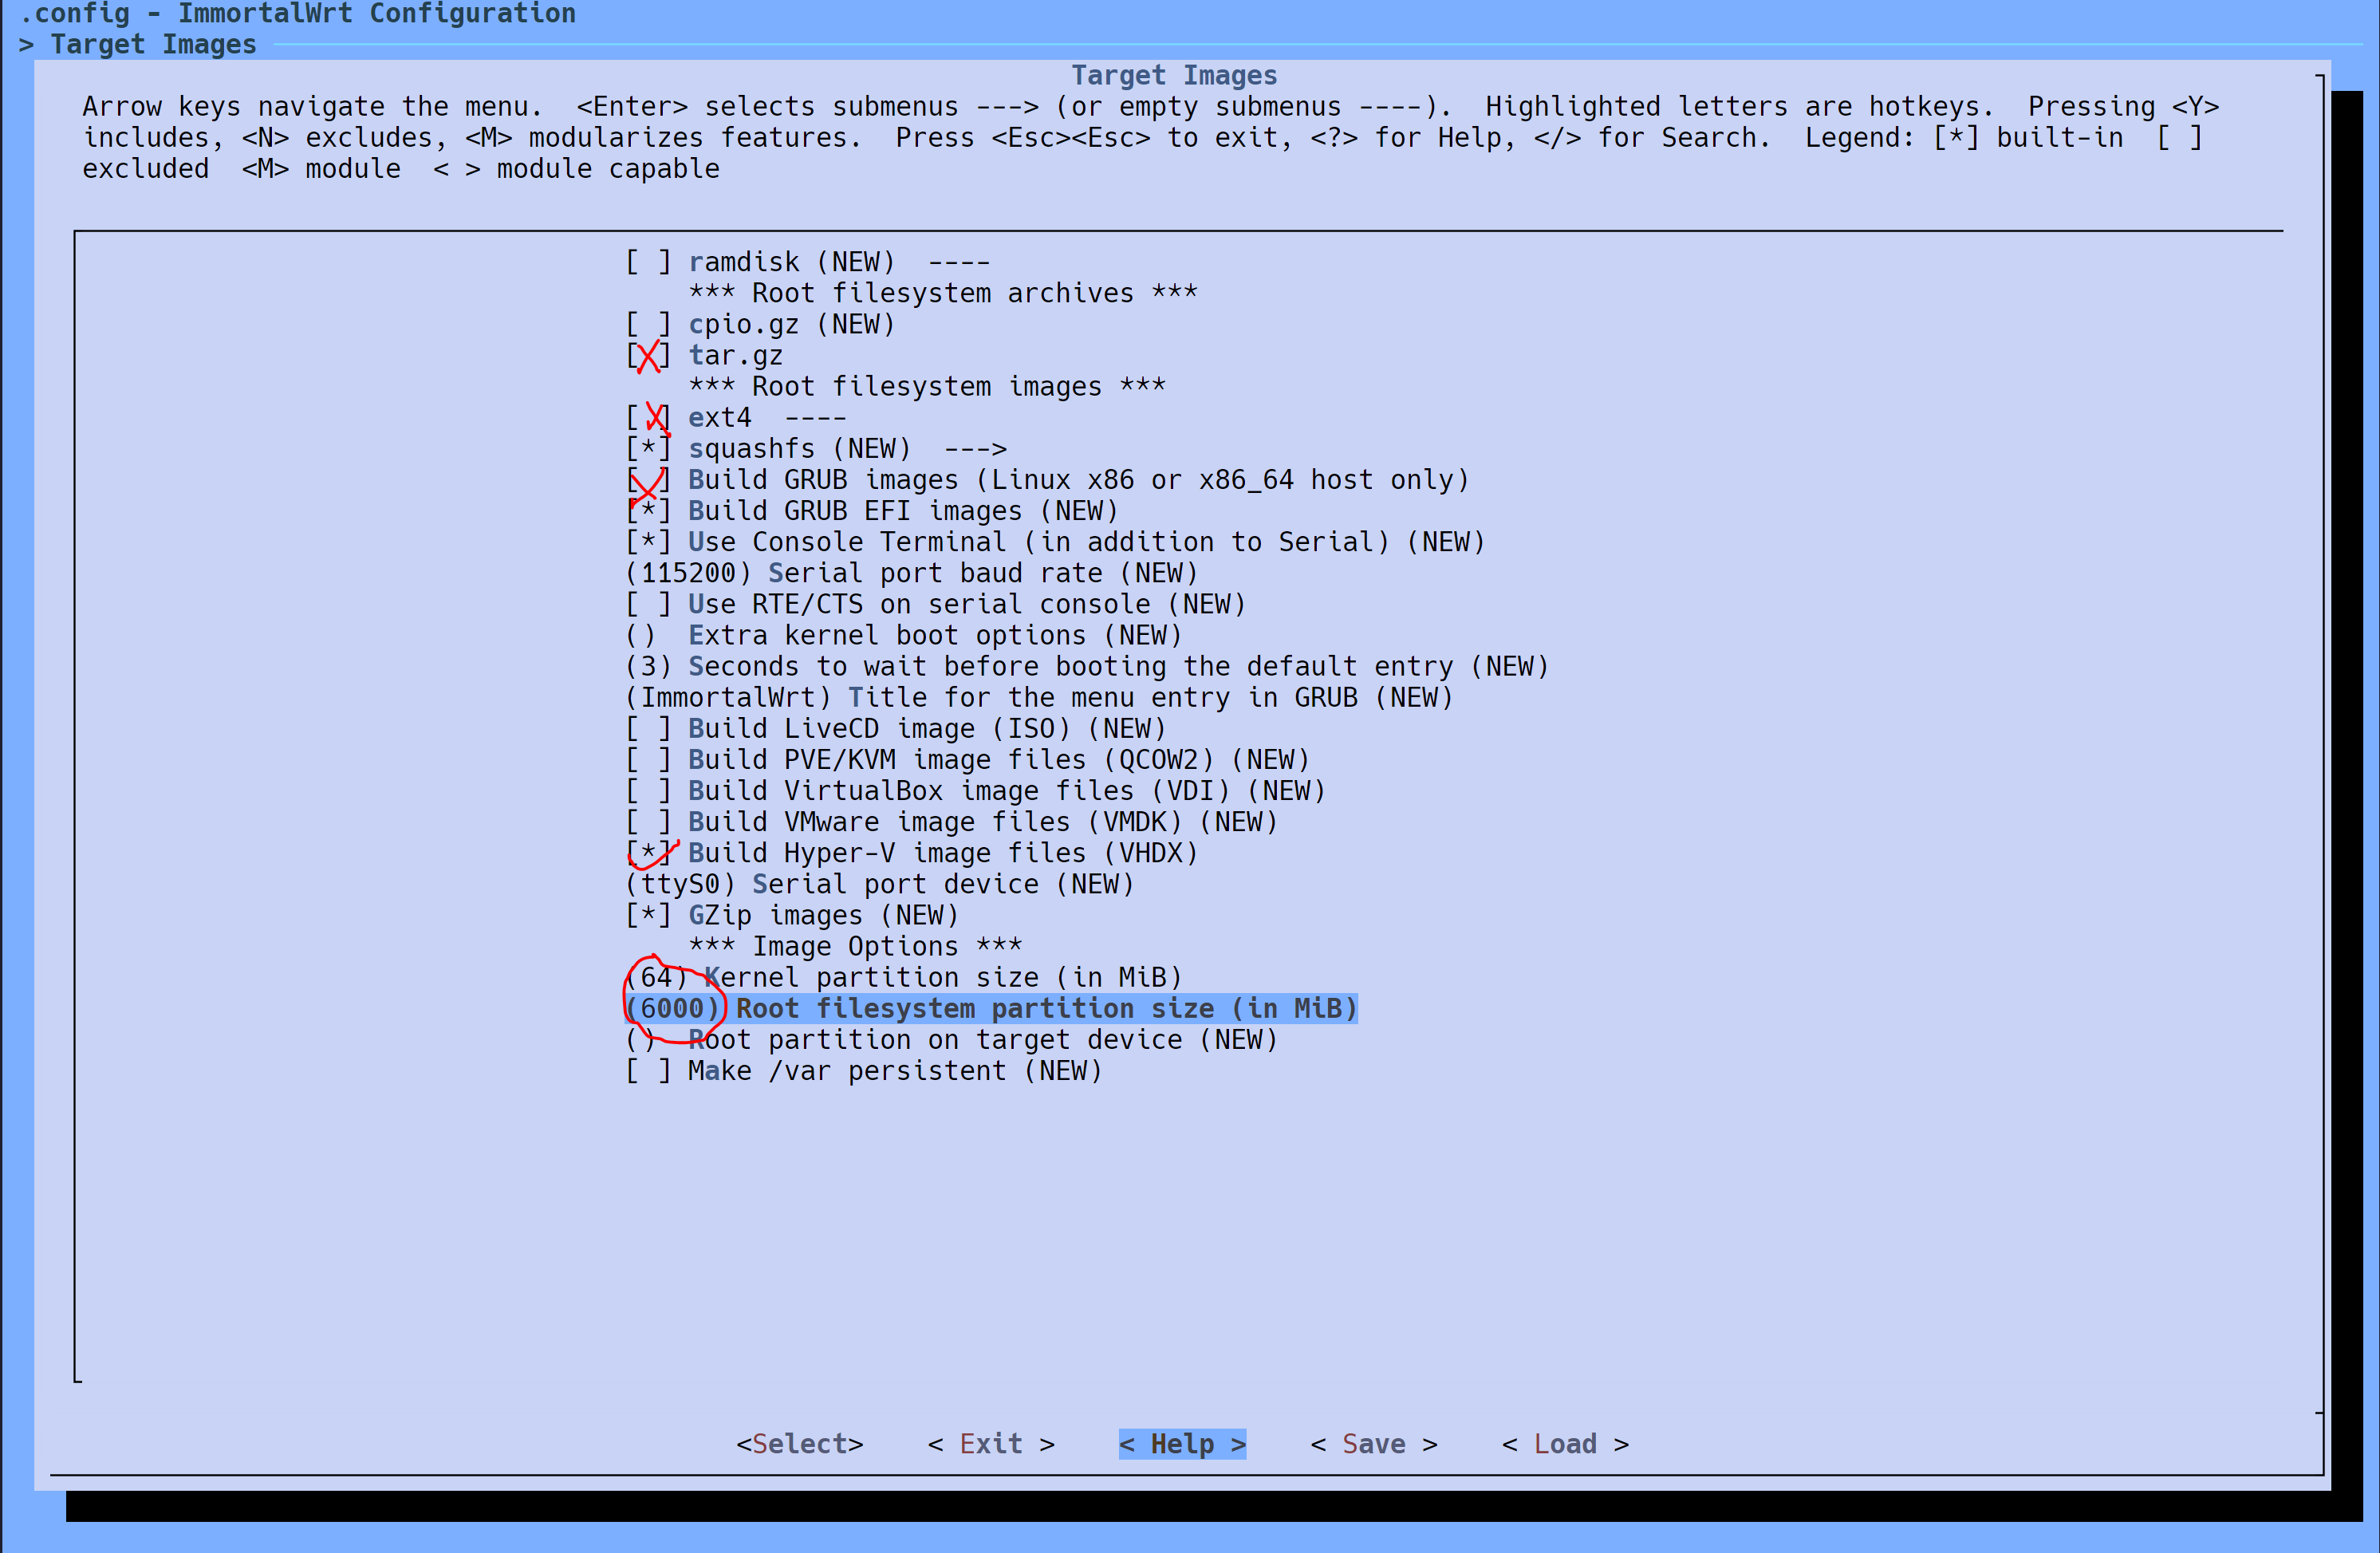
配置 immortalwrt
我的配置:
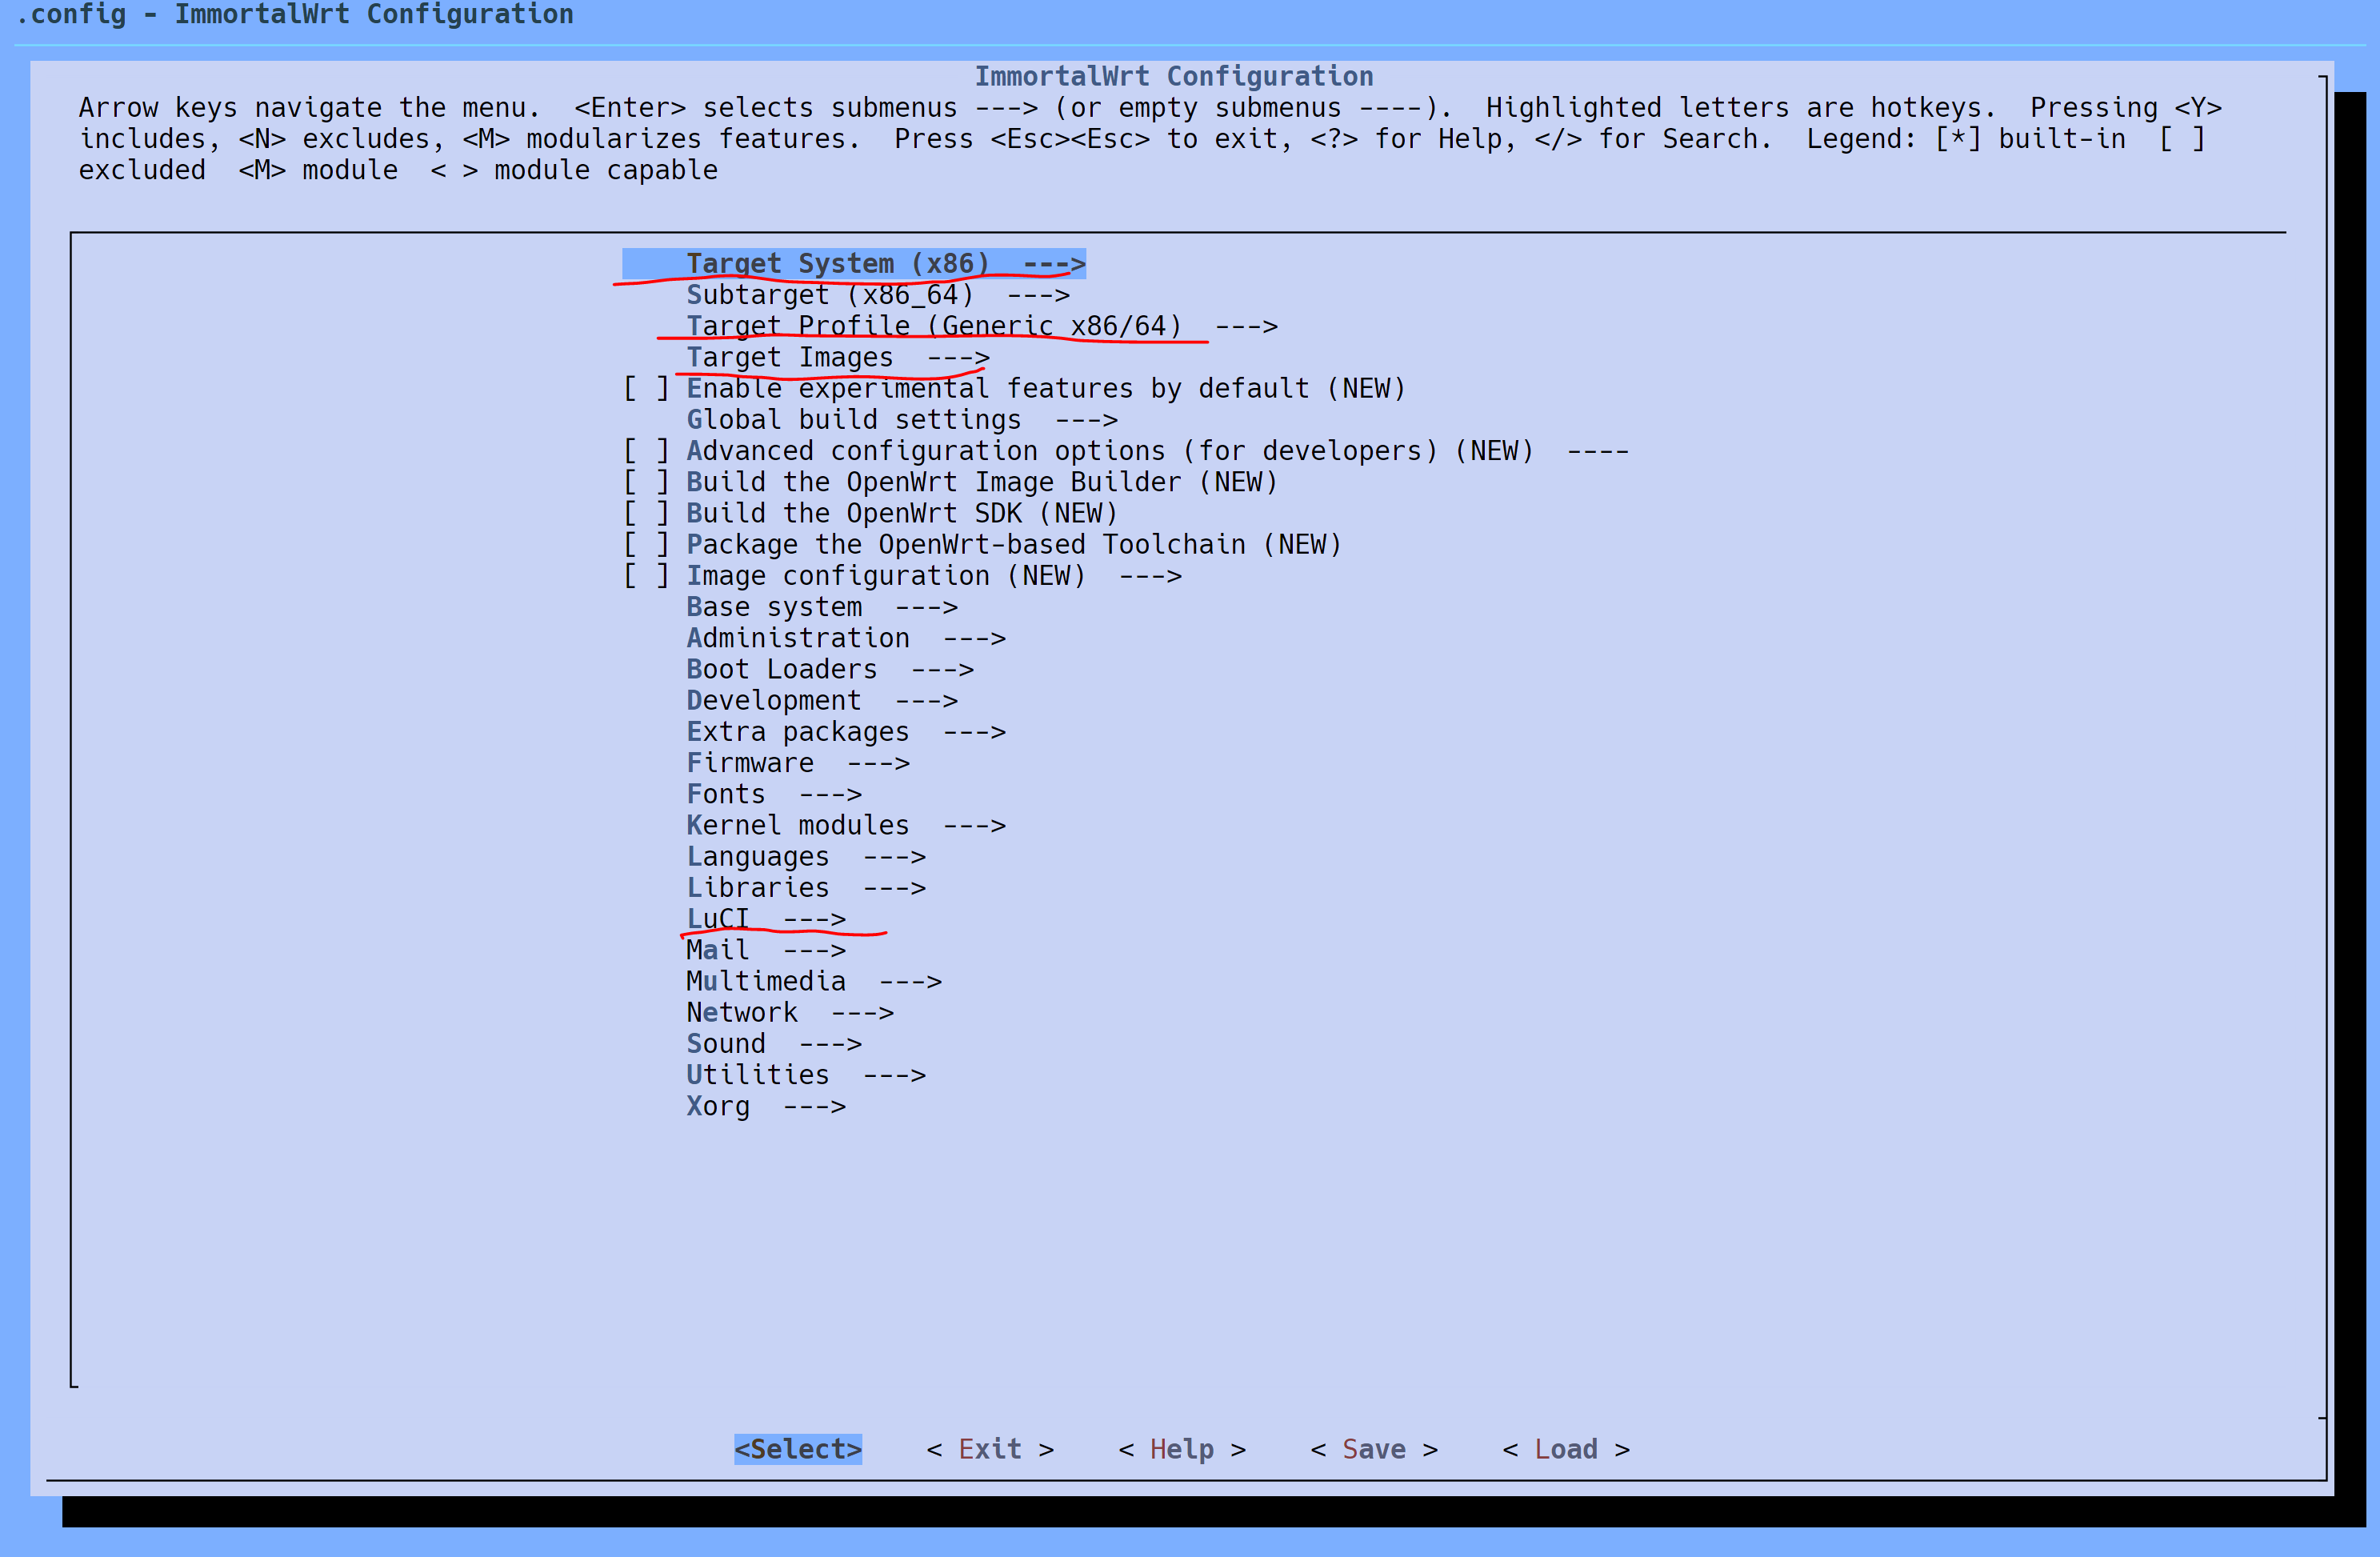
Luci -> Thems 和 Apps 根据需求定制即可。
下载与编译
建议先下载再编译,避免因为网络问题而编译卡住。
1
2
|
make download V=s
make -j$(nproc)
|
下载使用单线程,因为国内的网络环境很有可能需要随时调试。编译可以使用多线程,如果遇到报错的话使用单线程编译 make -j1 V=s 排错。
推荐第一次编译使用单线程,确保可以编译成功后,再使用多线程编译。已经编译过的代码不会重复编译,因此第一次编译会比较慢,后面就会快很多。
编译结果保存在 bin/targets/x86/64/ 目录下。